Collaborating on Excel workbooks streamlines data collection and teamwork. As an experienced Excel user, I've found that a little preparation goes a long way before sharing files. Here are proven steps to set up your spreadsheets for safe, effective collaboration.
Enable Multiple Simultaneous Edits
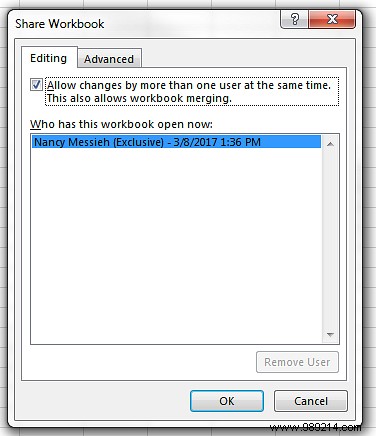
To allow multiple users to edit the same workbook simultaneously:
- Go to the Review tab, then under Changes, click Share Workbook.
- In the dialog box, ensure Allow changes by more than one user at the same time is checked.
- Save the file to a shared network location accessible by your team.
Keep in mind: simultaneous edits can lead to conflicts if users change the same cells. The file owner will receive an alert to review and accept or discard changes, preserving data integrity.
Protect Worksheets, Workbooks, or Specific Cells
Lock down sensitive data to prevent accidental changes or deletions—protect entire worksheets, workbooks, or individual cells.
To protect a worksheet or workbook:
- On the Review tab, click Protect Sheet (or Protect Workbook for the full file).
- Enter a password—users with it can unprotect, while others can still view.
- Under Allow all users of this worksheet, select permitted actions like formatting cells, inserting rows/columns, or adding hyperlinks.
To protect specific cells (leaving others editable):
- Select the editable cells, right-click, and choose Format Cells.
- Go to the Protection tab and uncheck Locked.
- Follow the three steps above to protect the sheet.
Now, only unlocked cells remain editable.
Add Dropdown Menus for Controlled Data Entry
Restrict inputs to predefined options using dropdown lists—ideal for consistency in shared sheets. Users can select from the list or type freely, if allowed.
To create a dropdown for specific cells:
- On a separate sheet, list items in a row or column.
- Select the list, right-click, and choose Define Name.
- Name it (no spaces) in the dialog box.
- Select target cells on the data sheet, go to the Data tab, and click Data Validation.
- On the Settings tab, set Allow to List.
- In Source, enter
=ListName. - Check In-cell dropdown; uncheck Ignore blank to prevent empty entries.
Optional enhancements:
- On the Input Message tab, add a tooltip (up to 225 characters).
- On the Error Alert tab, enable alerts for invalid data with custom messages.
What's your go-to tip for sharing Excel workbooks? Share in the comments below.