Microsoft Word's built-in spell checker, grammar checker, and robust dictionary tools help ensure professional, error-free documents. As digital content creation grows, these features are essential for catching typos and improving clarity—especially since we're prone to more mistakes on screens.
Good writing impresses in every email and report. Even if you're not a wordsmith, these tools make polishing easy. For more options, explore 5 Smart Writing Tools to Proofread Important Documents. Most features run automatically, but customization—like AutoCorrect for faster typing or advanced dictionary options—unlocks their full power. Check out How to Enable AutoCorrect Everywhere in Windows.
In this guide, drawn from years of expertise with Microsoft Office, we'll cover spelling and grammar checks, then dive into dictionary mastery.
Word provides multiple ways to proof your document. Here's how, step by step.
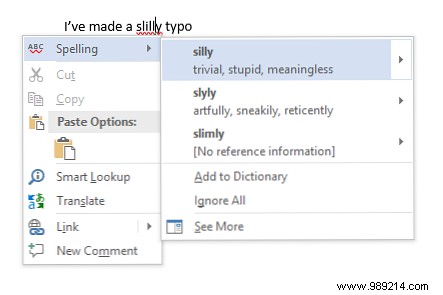
By default, Word uses online spell checking: misspelled words get a red underline. Right-click to see suggestions and pick the right one.
Word isn't perfect—it might flag correct but uncommon words. Learn more in How to Stop Microsoft Word from Underlining Correct Words as Errors. To ignore once, choose Ignore All. For frequent use, select Add to Dictionary so it remembers.
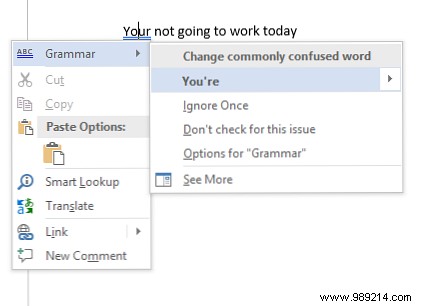
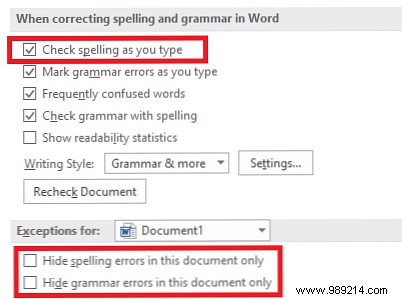
Grammar issues appear with blue underlines, handled similarly. Adjust settings via File > Options > Proofing.
For a full scan, go to the Review tab and click Spelling & Grammar, or press F7—one of 60 Essential Microsoft Office Keyboard Shortcuts for Word, Excel, and PowerPoint. Word cycles through issues for quick fixes, ideal for long docs.
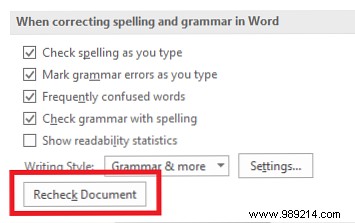
To reset ignores, go to File > Options > Proofing and click Recheck Document.
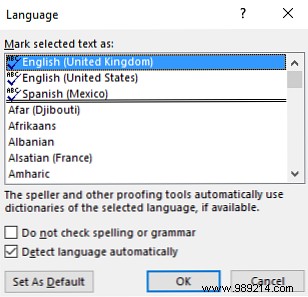
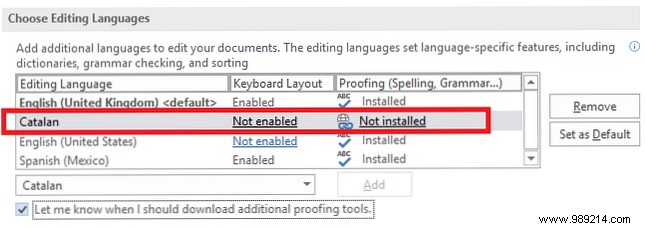
For multilingual docs, select text, go to Review > Language > Set Proofing Language. Installed languages show an icon; set defaults here too.
For technical docs with many proper nouns, turn it off: File > Options > Proofing, uncheck Check spelling as you type. It runs only on manual checks.
Hide for this doc only via File > Options > Proofing checkboxes at bottom. Or per-paragraph: select text, Review > Language > Set Proofing Language, and disable.
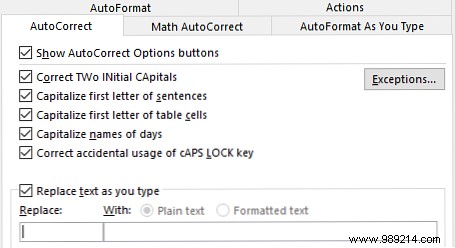
AutoCorrect fixes common errors on the fly (e.g., "teh" to "the"). Manage via File > Options > Proofing > AutoCorrect Options. Add shortcuts like "hmbs" expanding to "Hello, my name is Bob Smith" for text expansion efficiency—see What is Text Expansion and How Can It Help You Save Time?.
PowerPoint mirrors Word's real-time checks. Excel requires manual: Review > Spelling.
Beyond adding words (see Real-Time Spell Check), dictionaries offer pro-level control—no Cortana needed.
Clean periodically: File > Options > Proofing > Custom Dictionaries, edit, delete, or remove entirely.
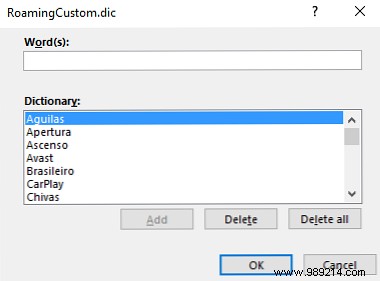
CUSTOM.dic is local; ROAMINGCUSTOM.dic syncs via cloud across devices.
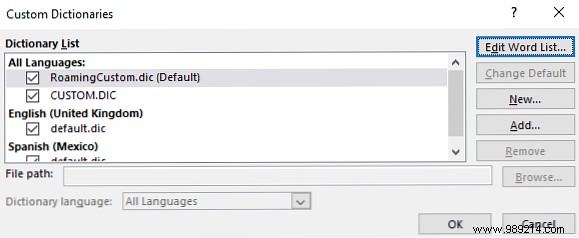
For languages: File > Options > Language, add and download. For custom (e.g., medical terms): Proofing > Custom Dictionaries > Add.
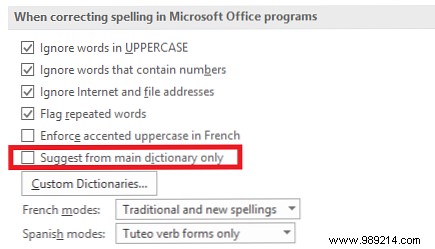
Force main dictionary only: File > Options > Proofing, check Suggest from main dictionary only.
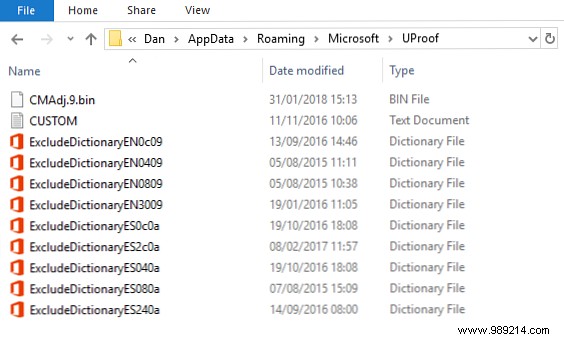
Prevent flagging real words like "ulitmo" instead of "ultimo": Edit exclusion lists at C:\Users\[username]\AppData\Roaming\Microsoft\UProof\. Open in Notepad, add one per line, save.
We've covered Word's core proofing tools—they work best together. What's your favorite trick? Hidden gems like those in 10 More Hidden or Overlooked Features of Microsoft Word?
Originally written by Chris Hoffman.