With years of experience optimizing spreadsheets for print, I've learned that Excel printing doesn't have to be frustrating. A well-prepared sheet prints crisply and professionally every time. While creating stunning charts—like those in our guide to powerful charts and graphs in Microsoft Excel—grabs attention on screen, printing demands specific steps. Here's your authoritative, step-by-step process to master it.
The key challenge? Knowing the exact sequence. Follow these proven tips from real-world Excel workflows, and you'll have flawless prints in minutes.
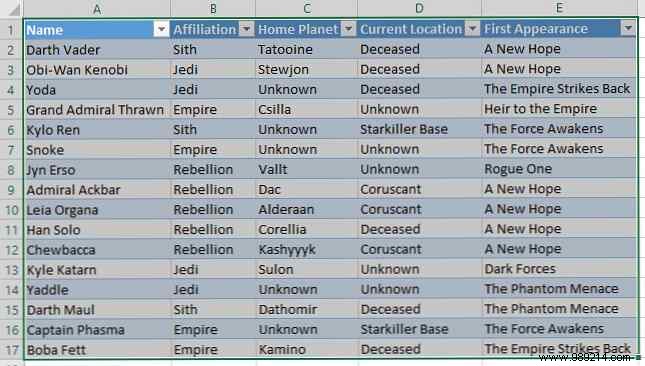
As with any Excel project, start by organizing your data thoroughly.

If your spreadsheet is ready, proceed. Otherwise, import data seamlessly using methods from our tutorial on importing data into Excel spreadsheets.
Organize your data into a table for easier printing and management—skip if not applicable, but it's a game-changer for most datasets.
To convert: Select your data range, press Ctrl + T, check My table has headers if true, and click OK.

Tables enable sorting by columns and treat data as a single unit, ideal for print prep. Pair with our Windows 10 printer setup guide for hardware readiness.
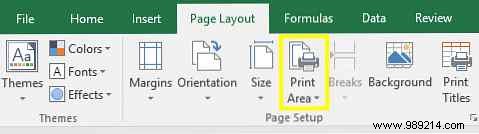
Define exactly what to print: Select your table (or data) with Ctrl + Shift + 8, go to Page Layout > Print Area > Set Print Area.
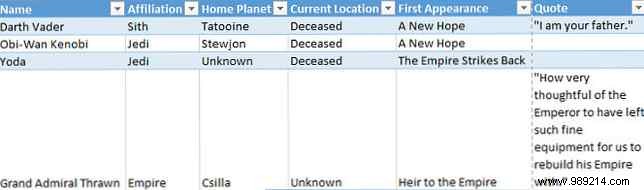
Adjust column widths for fit, but for lengthy entries—like citations—wrap text to avoid overflow and improve readability.

Select data, go to Home > Alignment > Wrap Text. Fine-tune row heights and column widths. This reduces eye strain, as detailed in our screen time reduction tips.
Go to File > Print for a live preview.
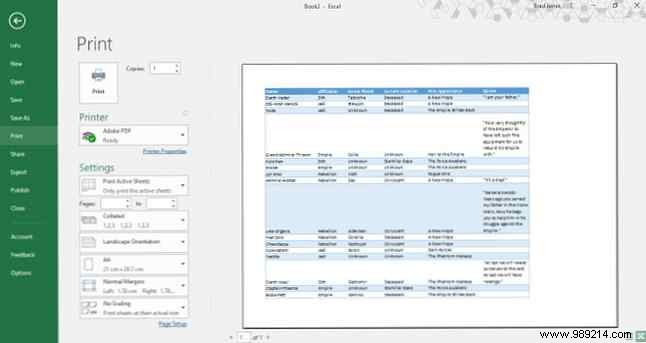
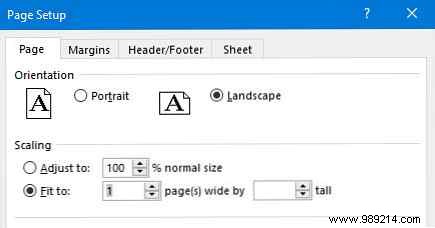
Choose portrait for tall data or landscape for wide tables. Use Narrow Margins to maximize space.
For optimal fit, select Scaling > Custom Scaling Options and use Fit Sheet to one page width/height or percentage scaling.
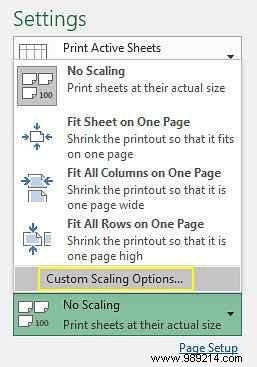
Perfect for single-page prints—see our Excel single-page printing guide.
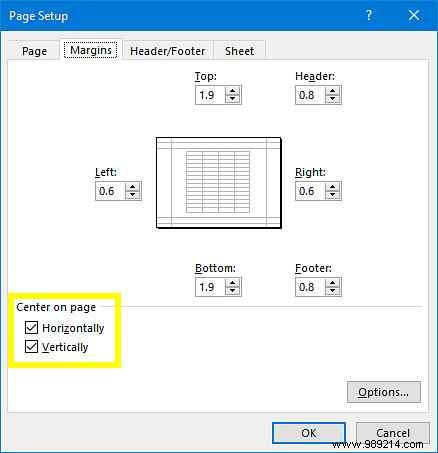
In Print view, Margins > Custom Margins, then check Horizontally and Vertically under Center on page.
Optionally, add headers/footers via Page Setup > Header/Footer.
Review the preview, tweak as needed—like our Word table formatting tips for similar polish. Hit print when perfect.
Excel printing pitfalls vanish with this methodical approach, drawn from extensive professional use. Your spreadsheets will now print like pro documents.
Struggling with print quality or have tips to share? Drop a comment below—we're here to help.